Creating Documents In Seconds With OpenAsset Templates

Creating beautiful customer-facing documents is an integral part of winning new business, but the process can pose a continuous challenge. On the one hand, your materials need to be formatted presentably and should be carefully tailored to your prospects’ needs – relevant projects should be highlighted, and employees whose experiences match the proposal need to be showcased. On the other hand, these documents must be created repeatedly, and therefore speed is a priority. This struggle between quality and speed is common, and we often hear how firms compromise on each when building their proposals.
With OpenAsset’s document templates, you won’t need to sacrifice either. With just a few clicks in your OpenAsset platform, anyone in your organization – no matter their design capabilities – can create stylish, tailored materials in seconds. Furthermore, because the templates have already been vetted from a branding stance, these documents will be pre-approved and ready for immediate use. To learn about the process of creating templates, read this article. This blog will focus on some of the key workflows where templates can benefit you.
Creating Project-Related Documents via InDesign Templates
The most common use case for templates is the creation of materials related to bid proposals, such as brochures, case studies, one-pagers, and more. These templates pull in project images, field information, or more frequently, both, and multiple templates can be created to work for different scenarios. Examples of this include foreign language templates, client-specific templates (for clients you frequently work with), or templates of varying lengths and page formats. Having these different options on-hand means you can be flexible to the proposal’s needs, allowing you to produce suitable formats at a second’s notice. Let’s use a real-world example to illustrate where this may come in useful.
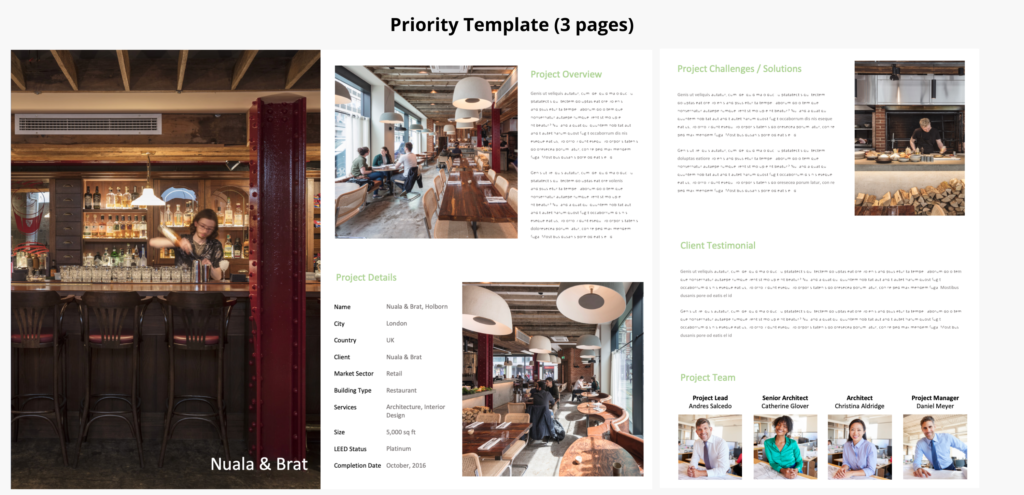
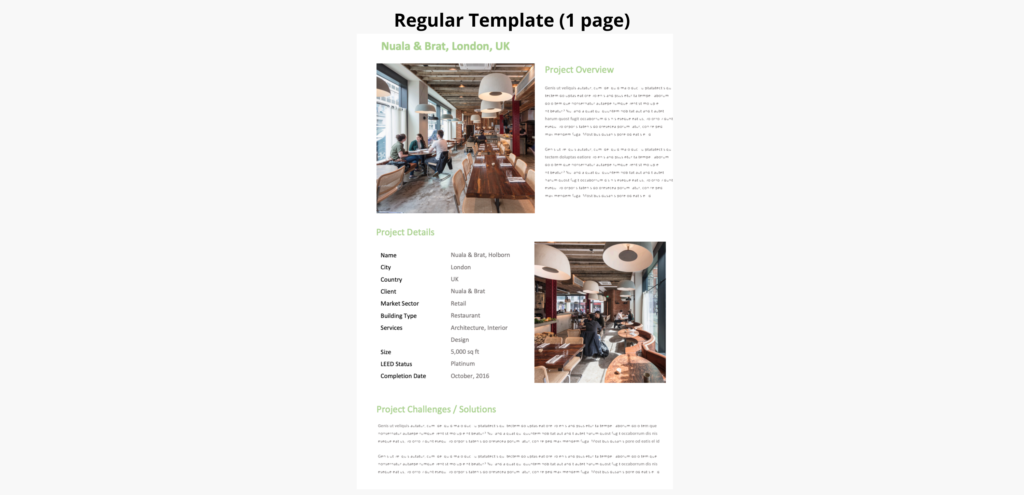
Imagine you are pitching for the design of a new sustainable retail space in London, and you are looking to quickly put together some case studies containing relevant project data. Perhaps there’s one project in your portfolio that meets these same criteria, and you want to make it stand out in your proposal. Instead of allocating the same page space to all of your projects, you could utilize two premade templates – a ‘standard’ template, and a ‘priority’ template. The ‘standard’ template might be used to showcase projects which you are proud of, but aren’t necessarily the closest fit to the project description. This template might show one project per page, pulling in two photos, a ‘short description’, and other high-level field data. On the other side, the ‘priority’ template might be used to highlight a project which is more comparable to the one you are bidding for. This template might dedicate three pages to the project – a full-page hero image might be followed by two pages filled with additional photos, a ‘long description’, all of the field data, and associated employees and their roles. Assigning this space to your most relevant project could provide the ‘wow’ factor to your client, and show that you’ve thought about what past experience matters to them.


Additionally, the image selection for each template can also be automated, via image ranks. Depending on how you’ve set up your ranks, you might want to only pull in images ranked ‘1’, or alternatively you may want to pull in a hierarchy of images from ranks 1 to 3, with number 1 in the most prominent position. No matter what process you use, you can always change your mind by switching images in and out via the InDesign drag and drop feature.
The scenario above is of course just one example of what templates might look like for your project-related documents. We recommend you look back at your previous brochures and case studies, and see what formats you typically use, and base the design of your templates around this. You will also have to consider which custom fields should be added to your OpenAsset system in order to push project data into your document templates.
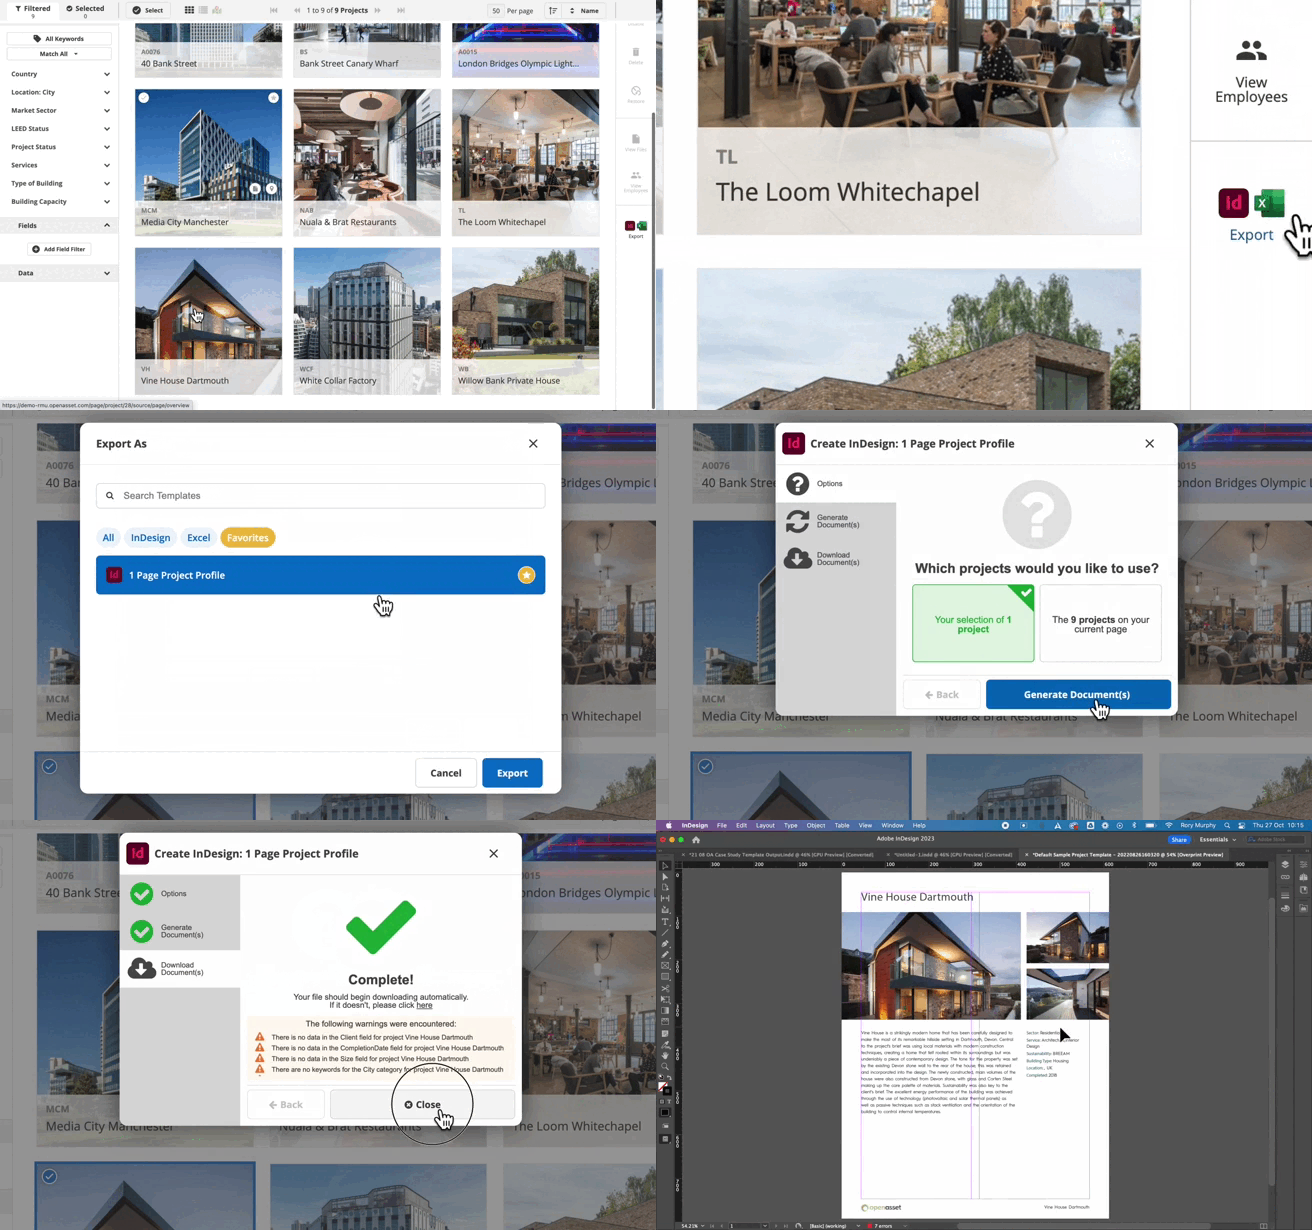
To create a project document by launching a template, follow the below recording:

Creating Employee Resumes via InDesign Templates
Another workflow where templates can drastically cut time is the process of creating employee resumes. Resume-specific templates pull in data from your Employee Module to create uniform, branded resumes for your whole team. As discussed in this blog, your employees’ data, such as job title, project experience, and certifications, is constantly changing so it doesn’t make sense to re-use the same resume for every proposal. It’s also important to tailor employees’ project experience to suit the specific requirements of each bid. With this in mind, our resume generator makes it simple to not only create these documents, but to tailor the information to suit specific bids whenever needed.
Continuing with the retail bid example above, you may want to highlight an employee, or employees, with experience in leading a retail project with a LEED status of Platinum. While his or her resume may already include this information, you may want to re-work the format so that this experience is prioritized.
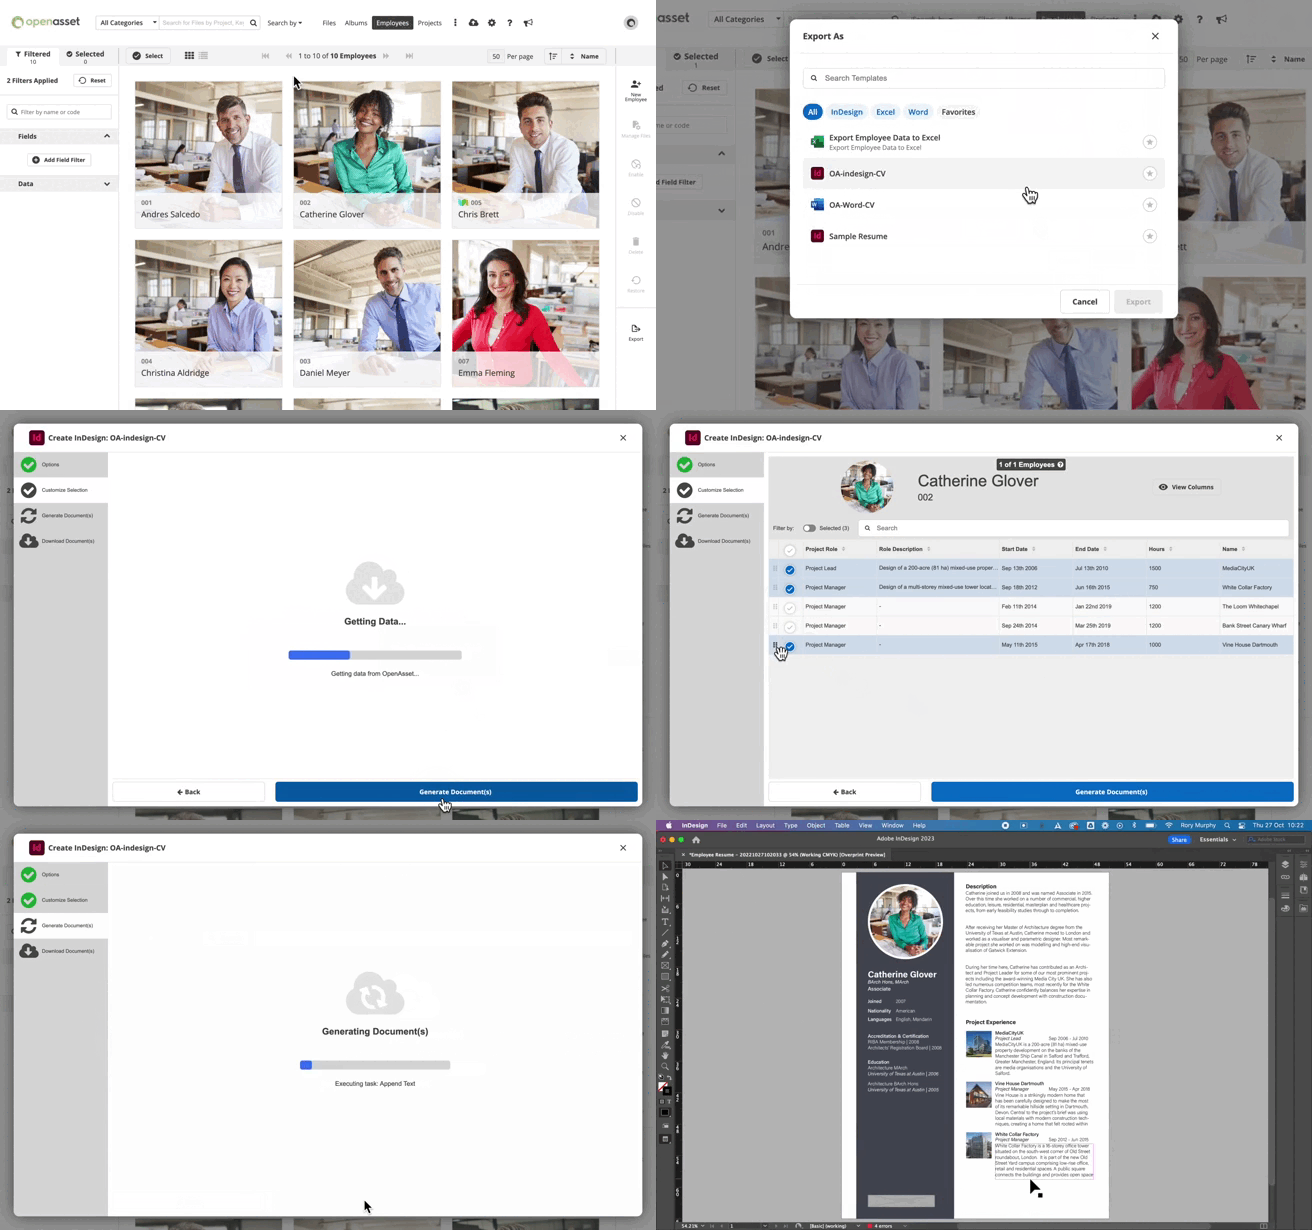
This can easily be achieved when generating the resume, via the steps below:
- Select the employee, or employees, to create the template for, and click the InDesign plugin icon.
- Add or remove data columns using the ‘View Info’ button.
- Deselect any projects which may not be relevant to the proposal. You can use the search filter to identify particular projects or project qualities. You can also sort projects by the number of hours that an employee worked on a project
- Sort the projects, or manually bring a project to the top, if it’s of particular significance.
- Generate the document.

Additionally, just as you can with project templates, you can create multiple employee templates so that you’re flexible for different scenarios. For example, the project lead might have a page dedicated to their resume, while other members of the team might have their resumes compressed to a two-per-page format.
Note: Employee resumes are only available to Employee Module subscribers
Creating Materials in PowerPoint & Word
If you’re not an InDesign user, OpenAsset still offers a number of ways in which you can create beautiful materials.
PowerPoint Templates
The Powerpoint plug-in allows you to create elegant presentations directly from your OpenAsset platform. This can be helpful if you’ve been drafted into a presentation at short notice and need a quick, presentable way of showing your project images. A best practice tip here is to first create an album of your best images, and then create the PowerPoint from your album selection. PowerPoint templates can be created in two ways: in collaboration with OpenAsset, or through the self-serve template editor.
In Collaboration With OpenAsset’s Support Team
Templates can be created with the help of OpenAsset’s support team, in the same way that you would collaborate on an InDesign template. You would send us a spec version of the document, and our support team will create a custom script that mirrors the example. These templates can be highly customized, allowing for the placement of images and text in different frames and with each slide having its own dedicated format.
Self-serve Creation Via The Template Editor
Alternatively, through the OpenAsset PowerPoint Template Editor, you can build your own custom templates. You can choose from a number of predefined image placements, create and format your text placeholders, and produce multiple templates for different scenarios. While the self-serve editor has more limited customization options versus utilizing our support team, it is a very useful tool for creating easy-to-use templates in a matter of minutes.
Read more about the PowerPoint Template Editor here.
Templafy Connector
The Templafy Connector is a searchable window that lives within your Powerpoint or Word programs, linking to all of the files within your OpenAsset platform. While the Templafy connector doesn’t automate template creation, it does allow for the easy placement of OpenAsset images into your documents or slides. By creating your own templates in Powerpoint or Word, and using image frames within these templates, you can quickly place your files, making the process of creating new documents more efficient.
For more information on Templafy, check out this article
Getting Started
OpenAsset was built to ensure that you get the most value from your images by removing as many barriers to usage as possible. Templates are a fundamental part of this, enabling you to repeatedly create beautiful, tailored documents with minimal effort. Whether your documents are project-related or employee-related, and whether you use InDesign or the Microsoft Office Suite, our platform has you covered.
To learn more about templates, and how you can create them to work for your specific needs, feel free to reach out to your dedicated Customer Success Manager. Or, if you have other general questions, reach out to our Support team, here.
The post Creating Documents In Seconds With OpenAsset Templates appeared first on OpenAsset.